How To Reinstall Windows Without Losing Anything Here Is Another Possible Solution:easy way and tested:
1- Start WindowsXP
2- Go to the location of your source files
3- Run WINNT32 /unattend
For example, D:\I386\winnt32 /unattend ( copy & paste this command into the RUN box, then press ENTER ) Your computer will do the rest.
Or,
Start > All Programs > Accessories > Command Prompt.
Copy & paste > D:\I386\winnt32 /unattend
Press Enter.
If you have i386 on your drive, you can replace D: ( if D: is your cd drive ) with the location of it.
I've often need to do this to repair something that had gotten corrupted and didn't want to do a clean install.
D: is the driver letter where your windows XP Cd is
if D:\I386\winnt32 /unattend doesn't work then try : d:\winnt32 /unattend.
Showing posts with label Windows XP. Show all posts
Showing posts with label Windows XP. Show all posts
Thursday, June 12, 2008

Sunday, April 27, 2008
Disable Internet Access for Users in Windows
To disable Internet access for users in Windows, you can apply the following tricks. By applying the following tweaks, you should be able to disable Internet access in Windows. To enable the access again simply revert back the tweaks.
You need to set up a false proxy configuration and any application which rely on Microsoft Proxy server like Internet Explorer, Office, outlook Express, Opera browser and many other applications will not be able to access the Internet. Simply users will not be able to use Internet anymore.
Note: The following tweak rely on Registry editing, and if you have never tweaked Windows' Registry before, I suggest you read, how to safely edit Windows' Registry.
Set up a false proxy server using Windows Registry to disable Internet access:
- Start Registry Editor.(Start->Run->"regedit")
- Go to, HKEY_CURRENT_USER\Software\Microsoft\Windows\CurrentVersion\Internet Settings
- Set the value of "ProxyEnable" to 1. (if doesn't exists, create a new DWORD value)
- Change the value of "ProxyServer" and set it to an IP address and port that is invalid on your network such as "0.0.0.1:2222" (i.e. "IP:Port"). (if doesn't exists, create a new STRING value)

However, users can still make changes to Internet configuration and may access the Internet by disabling the proxy server. To make sure, users cannot modify the proxy server configuration, do:
- Start Registry Editor.(Start->Run->"regedit")
- Go to, HKEY_CURRENT_USER\Software\Policies\Microsoft\Internet Explorer\Control Panel
- Create two new DWORD values and name them as "Connwiz Admin Lock" and "Connection Settings". Set the values of both to 1.
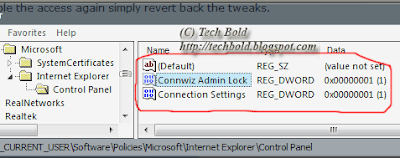
To remove the restrictions, set the proxy settings back to their original values and delete the policy values.
Truly Enable/Disable Run Dialog in Windows
Most people think that run dialog in Windows can be easily disabled or enabled by using the Start menu properties. You can right click on the Taskbar, click on properties and then click on the Start Menu tab, click customize, click advanced, and from there you can remove the run dialog from the Start Menu in Windows XP and Vista.
Why it will not work from Taskbar Properties?
However, this is not full proof. Why? Because users can still press Windows' Key+R to open the run dialog. Or they can open Task Manager and click on file, then on to new task (run) to open run dialog box. Additionally they can open Internet Explorer or Windows Explorer and use the address bar as run dialog. No kidding!
Truly disable run Dialog from Start Menu, Internet Explorer/Windows Explorer, and Task Manager
To truly disable run dialog from running or should I say disable users from running any program from command line, do this:
- Start Group Policy Editor. (Start->Run->"gpedit.msc") (Ironically we are using run dialog box!)
- On the left, go to User Configuration->Administrative Templates->Start Menu and Taskbar.
- On the right, enable this setting "Remove run from Start Menu". (see figure below)

If you enable this setting, the following changes occur:
- The Run command is removed from the Start menu.
- The New Task (Run) command is removed from Task Manager.
- The user will be blocked from entering the following into the Internet Explorer Address Bar:
- A UNC path: \\
\ - Accessing local drives: e.g., C:
- Accessing local folders: e.g., \temp>
Users will no longer be able to display the Run dialog box by pressing the Application key (the key with the Windows logo) + R.
If the user tries to open run dialog using any method, he'll get a message saying that the run dialog is disabled by Administrator.

Disable right click for Windows
The following tricks will let you disable right click for Windows, which means completely disable right click for files, folders, explorer, desktop etc. Since, the first trick doesn't stops right click access for Taskbar and Start Menu, but the second trick will let us disable right click access for Taskbar, Start menu and the clock. However, both the tricks will not disable the system menu (i.e. restore, move, size, close etc when you right click on title of any application).
Disable right click for Taskbar and Start Menu
- Start Group Policy Editor. (Start->Run->"gpedit.msc")
- On the left, go to User Configuration->Administrative Templates->Start Menu and Taskbar.
- On the right, enable this option "Remove access to the context menus for the taskbar".
The above setting hides the menus that appear when you right-click the taskbar and items on the taskbar, such as the Start button, the clock, and the taskbar buttons. This setting does not prevent users from using other methods to issue the commands that appear on these menus.
Disable right click for Desktop, Files, Folders and Windows Explorer
- Start Group Policy Editor. (Start->Run->"gpedit.msc")
- On the left, go to
- User Configuration->Administrative Templates->Windows Components->Windows Explorer.
- On the right, enable this option "Remove Windows Explorer's default context menu".
The above setting removes shortcut menus from the desktop and Windows Explorer. Shortcut menus appear when you right-click an item. If you enable this setting, menus do not appear when you right-click the desktop or when you right-click the items in Windows Explorer. This setting does not prevent users from using other methods to issue commands available on the shortcut menus. Which means, users can still press F2 to rename a file or folder and press Delete to delete a file.
Disable Access to Task Manager in Windows
The task manager in Windows XP and Windows Vista can be disabled in two ways. You can disable the task manager either by making a registry entry or by using the Group Policy Manager. I would prefer the latter since it is much more convenient and you don't have to worry about backing up the registry in case something goes wrong.
Note: Before making any changes to the Windows registry, make sure you do a backup, in case something is messed up and so that you can restore things to normal. For any help, read How to safely edit, backup, and restore Windows registry.
Disable the Task Manager using Windows Registry
- Start Registry Editor. (Start->Run->"regedit")
- To disable Task Manager for current user logged in, go to
- HKEY_CURRENT_USER\Software\Microsoft\Windows\CurrentVersion\Policies\system
- or
- To disable Task Manager for the whole system, go to
- HKEY_LOCAL_MACHINE\Software\Microsoft\Windows\CurrentVersion\Policies\system
- Create a new DWORD value named "DisableTaskMgr".
- Set its value to 1 do disable Task Manager or 0 to enable Task Manager. (see below figure)

(click on image for larger preview)
You may need to restart your system for this setting to take effect.
Disable the Task Manager using Group Policy Editor
- Start Group Policy Editor. (Start->Run->"gpedit.msc")
- On the left, go to User Configuration->Administrative Templates->System->Ctrl+Alt+Del Options.
- On the right, enable this setting "Remove Task Manager".

If this setting is enabled and users try to start Task Manager, a message appears explaining that the Task Manager has been disable by the Administrator.

by thegrchet
Hide Username from Windows Login Screen
By default Windows lists each username in the login screen, except for the Administrator. You can hide a username from the Windows XP login screen by creating a registry entry. However, even if you hide the username from the login screen, it is possible for that user to login by the old Windows 2000 Ctrl+Alt+Del method.
By Pressing Ctrl+Alt+Del, the old small login screen kicks in, and the user can enter his username and password to login to the system.
Hiding a Username by Making a Registry Entry
- Start Registry Editor. (Start->Run->"regedit")
- Go to, HKEY_LOCAL_MACHINE\SOFTWARE\Microsoft\Windows NT\CurrentVersion\Winlogon\SpecialAccounts\UserList
- Create a new DWORD value named to the username you want to hide. For example, if the username you want to hide is "Vikas", create a new DWORD value called "Vikas" and give it a value of 0 to hide it from login screen.
- Now log off to see it in action. You can press Win+L to temporary lock the system to check if it's working or not.

Note: Before you try to edit the registry, make sure you backup it first. For more information read how to safely edit the Windows' registry.
Put a command line on your desktop
Ok, so I know not many people use command prompt anymore especially if they are much satisfied with the user interface of Windows, but there are many things which command prompt offers which Windows GUI can't. For example, you can make a folder super hidden only from command line, or launch your favorite programs without typing the whole addresses etc.
If you use command line regularly you'll love this new trick which puts a command line right on your desktop. You can use this to launch windows explorer shortcuts, open web addresses (web sites and web pages), right from your desktop.
You can put a command line on your desktop by:
- Make sure Taskbar is not locked!
- Right click on the Task Bar and go to Toolbars.
- From the menu, click on Address.
- A new "Address" should appear on your Taskbar.
- Simply drag the "Address" to any where on the Desktop including top. (see figure below)
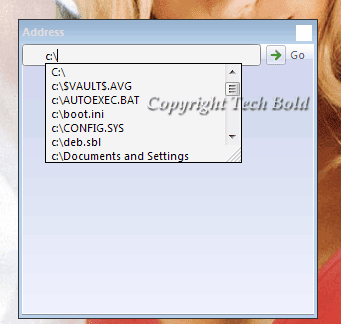
So, from now on you can simply type any address (local i.e drives, Internet address i.e. web sites or any type of address including network address) and have it open instantly in Windows Explorer or in your Internet browser.
Add me at:: getunplugged@gmail.com
Disable a user from logging off Windows
In order to make sure that a user always shuts down the Windows instead of logging off, you can disable the logging off options from the Windows. By disabling the logging off options, a user can either switch the user, or will have to shut down the system. He/she will not be able to log off the system, but will be able to shutdown the system.
In order to remove the logging off option from the Window, you'll have to remove the "Log Off" from the start menu and from the Task Manager as well.
1. Remove Log Off option from Task Manager
In order to remove the "log off
- Open Group Policy Editor (Start->Run->"gpedit.msc")
- On the left go to, User Configuration->Administrative Templates->System->Ctrl+Alt+Del Options.
- On the right, Enable this setting "Remove Logoff". (see figure below)

This setting does not let the user log off the system by using any method, including programs run from the command line, such as scripts. It also disables or removes all menu items and buttons that log the user off the system except from the Start Menu.

2. Remove Log Off from the Start Menu
To remove the log off button from the Start Menu, do as follows:
- Open Group Policy Editor (Start->Run->"gpedit.msc")
- On the left go to, User Configuration->Administrative Templates->Start Menu and Taskbar.
- On the right, Enable this setting "Remove Logoff on the Start Menu". (see figure below)

If you enable this setting, the Log Off

Delete files permanently using Super Shredder
Whenever you delete some files from your system, the file is actually not erased from the system, only the index pointing to the file is destroyed, but the file's data can still be recovered.
When you delete a file on your computer, the data in that file can remain on your hard drive for weeks or even months until something else overwrites the space that it occupied.

Even if the file no longer appears in recycle bin, they can still be recovered. This poses a security threat because if anyone else has access to your system, he/she can recover deleted files and the confidential data.
If you want to permanently delete your file, you can use Super Shredder. SuperShredder works by destroying the data inside the file BEFORE it deletes the file from the system - in this way ensuring that someone can't come back at a later date and retrieve sensitive material.

In order to delete a file you can use the program to create a Send-To Menu Association(see above figure).

Then you can simply send the files to be deleted to the SuperShredder Menu and confirm the file deletion.
It is a freeware, and you can click here to download SuperShredder.
Related posts:
Changing drive letters in Windows XP.
We all know that whenever you add another hard drive or a CD-DVD drive, Windows automatically assigns a letter to the corresponding drive. If in any case you want to change the letter assigned to any drive, or if the letters assigned are no suited to your system, you can definitely change them.
In order to change the drive’s letter, follow the steps:
- Right click My Computer and Click Manage.
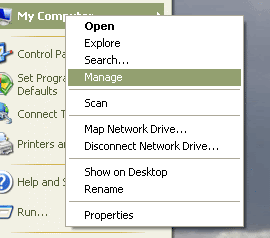
- Under Computer Management, click Disk Management.In the right side, you’ll see all the drives that are currently on your system.
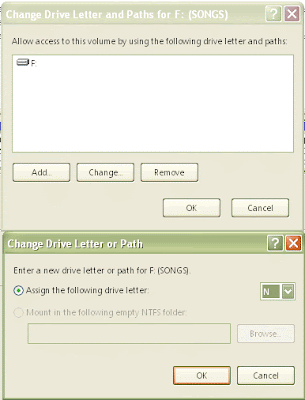
- To change the drive’ letter, right click the drive and then click Change Drive Letter and Paths.
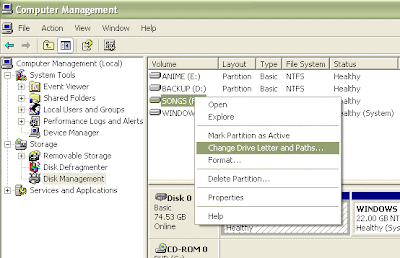
- Click Change, then click Assign the following drive letter, select the letter from the drop menu box, and then click Ok.
- Windows may warn you about changing the drive’s letter and that some program may not work, click Yes.
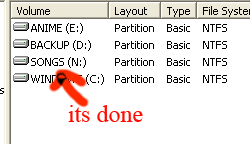
You’ll not be able to change the boot drive letter (usually C).
Note: The shortcuts will need to be updated for the changed drive’s programs. (Ex. F:\a.doc will become N:\a.doc).
Vista Transformation Pack 8.1 available for Download!

Yes, a new update has been released for Vista Transformation Pack. This is by far the most comprehensive transformation pack ever created for Windows XP.
So if you don't want to sacrifice the compatibility and performance of Windows XP but still want the new GUI features of Windows Vista, you can download VTP 8.1.

However, before you try to install Vista Transformation Pack over Windows XP, make sure to carefully read the installation notes (User Guides). In total there are four guides. The pack can be installed in Classic mode or the Express mode.
Here is the primary difference between the two:
Classic Mode: You're allowed to run a more configurable setup and can choose what you want to install.
Express Mode: The default setup mode where the required files are installed automatically.
Note: If you choose "Integrate Vista Transformation Pack into setup files" during installation you'll not be able to revert or uninstall the Transformation Pack. So, it is recommended to choose "Apply Vista UI transformation to system" during installation.
Download Vista Transformation Pack 8.1 for Windows XP.
Download Vista Transformation Pack 8 User Guides.
REGARDS,
thegrchet
Create Your Own ScreenSaver with Instasaver
How many times did you wanted to create your screensaver with your holiday pictures but just couldn't? However, Instasaver let's you create your screensaver with your favorite pics. The complete procedure is quite simple.

All you need to do is specify a screen saver name, upload the pics, set few settings such as speed, time delay, and the background. You can add various effects and choose from up to 150 different effects. Create the screen saver, download the screensaver as a installation application and run it on your computer. The screensaver runs fine on Windows XP, Windows 2000, and Windows Vista.
However, there are few restrictions such as you can only upload maximum of 10 pics and the file size can only be up to 500 KB. So, the next you wanted to create your own screen saver, you know where to head.
thanks [thegrchet]
Make any file or folder super hidden in Windows XP
Making any folder hidden in Windows XP is easy. But what about making any folder or file super hidden in Windows XP?

Why make a folder or file super hidden?
- Super hidden folders and files cannot be viewed even when "view hidden folder and folders" setting is applied. They can only be viewed only if "viewing super hidden files and folder" setting is applied.
- Super hidden files and folders become system files and changing the super hidden property of these files and folders is normally not possible.
- By making them super hidden, it allows your files to more secure in case any one is trying to finding files on your system.
The method involved
- Start Command Prompt. (Start->Run->cmd)
- Type attrib "filename or folder with complete path" +s +h
For Example, if the folder you wanted to make super hidden was located at C: and folder's name is 1234 then the path is C:\1234. You type "attrib C:\1234 +s +h" without the quotes. (see the following figure)

The folder properties will not allow anyone including you to make the folder visible in case you try to. (see the following figure)

(click on the image for larger view)
As you can see from the above image, the folder made super hidden cannot be made visible as the hidden property is grayed out. 
Subscribe to:
Posts (Atom)